Removing backgrounds in Photoshop is one of the most essential skills for graphic designers, photographers, e-commerce sellers, and content creators. Whether you need a transparent PNG for a product listing, a YouTube thumbnail cutout, or a clean composite, Photoshop offers tools for every skill level.
In this comprehensive guide, you’ll learn 5 different ways to remove a background in Photoshop—ranging from instant 1-click AI tools to high-precision manual techniques for hard edges and complex hair.
Watch the Video Tutorial
Download Practice Files
Want to follow along with the exact images used in this tutorial? Download the practice files below:
Table of Contents
- Quick Guide: Which Method Should You Use?
- Method 1: The 1-Click AI Method (Fastest Way)
- Method 2: Select Subject & Select and Mask (Best for People & Objects)
- Method 3: Refine Edge Brush (Best for Hair & Fur)
- Method 4: The Pen Tool (Best for Product Photography)
- Method 5: Color Range & Magic Wand (Best for Solid Backgrounds)
- How to Fix Common Masking Issues (Halos & Fringing)
- Keyboard Shortcuts Cheatsheet
- Frequently Asked Questions (FAQ)
Quick Guide: Which Photoshop Method Should You Use?
| Method | Speed | Precision | Best For |
| 1. Remove Background Button | Instant (1-Click) | Moderate | Simple subjects with high contrast |
| 2. Select Subject & Mask | Fast (AI + Manual) | High | People, animals, and complex objects |
| 3. Refine Edge (Hair & Fur) | Moderate | Very High | Fine strands of hair, fur, and soft edges |
| 4. Pen Tool | Manual (Slow) | Maximum | Hard-edge product photos and vehicles |
| 5. Color Range / Magic Wand | Instant | High | Solid color or plain white backgrounds |
Method 1: The 1-Click AI Method (Fastest Way)
If you need a quick cutout and your subject stands out clearly from the background, Photoshop’s built-in AI tool can do the job in seconds. Watch the video below, we’ve tried 10 image examples and you can see the results.
Steps:
- Open your image in Photoshop (`File > Open`).
- Unlock the background layer by clicking the Padlock icon in the Layers Panel (`F7`).
- Open the Properties Panel (`Window > Properties`).
- Scroll down to Quick Actions and click Remove Background.
- Photoshop’s AI will automatically detect the main subject and create a Layer Mask removing the background instantly.
Pro Tip: In Photoshop CC 2023 and newer, you can also use the Contextual Task Bar at the bottom of your workspace and click Remove Background.
Method 2: Select Subject & Select and Mask (Best for People & Objects)
When the 1-click method misses details, the Select and Mask workspace gives you full control to fix rough edges.
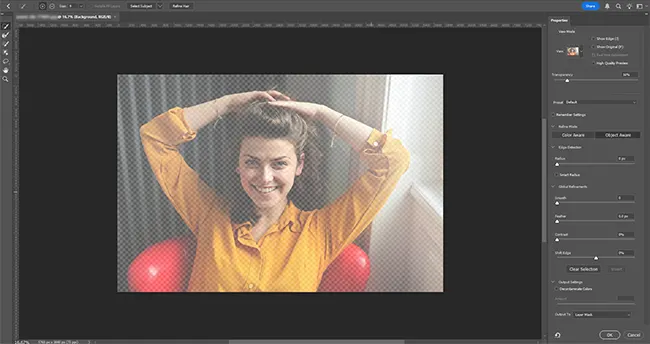
Understanding the Select and Mask Workspace
The Select and Mask workspace contains:
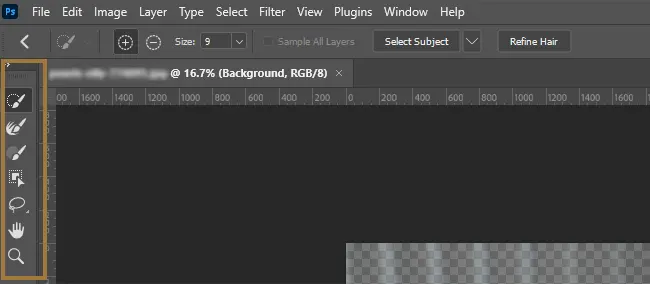
Toolbar (Left Side)
Includes tools like:
- Quick Selection Tool
- Refine Edge Brush Tool
- Brush Tool
- Object Selection Tool
- Lasso Tool
- Hand Tool
- Zoom Tool
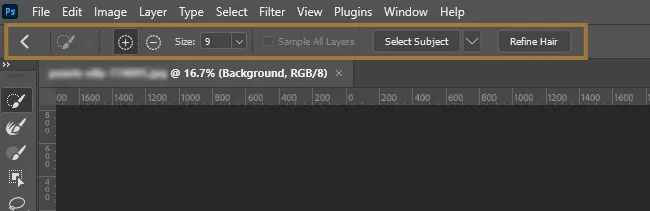
Options Bar (Top)
Displays settings for the currently selected tool.
Properties Panel (Right Side)
Contains:
- View Modes
- Global Refinements
- Output Settings
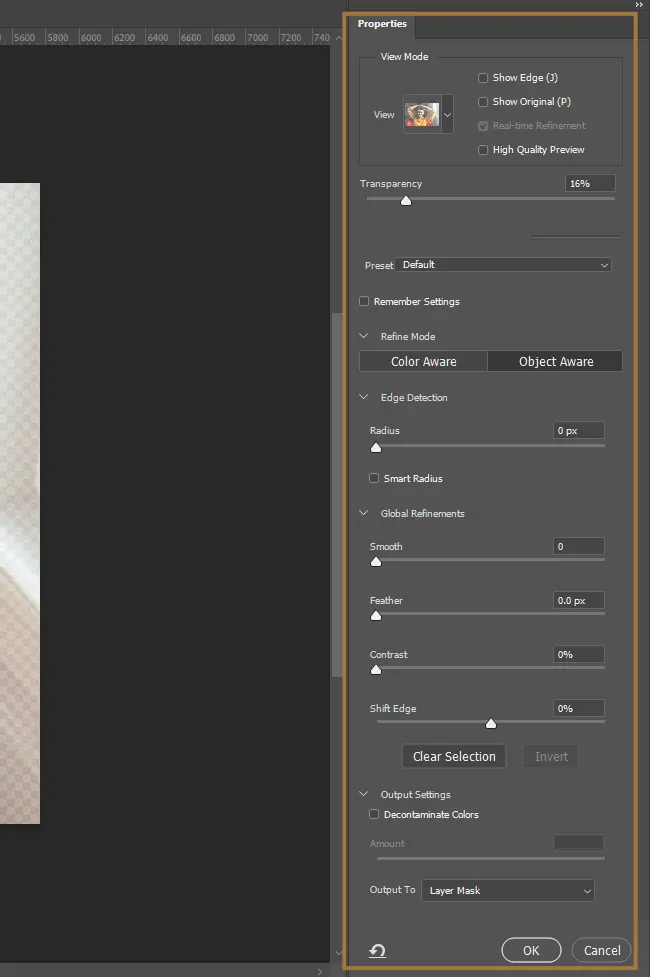
These controls help refine edges and improve the quality of your cutout.
Step 1: Open Your Image in Photoshop
Open your image and go to Select > Select and Mask from the top menu (or press `Ctrl + Alt + R` on Windows / `Cmd + Option + R` on Mac).
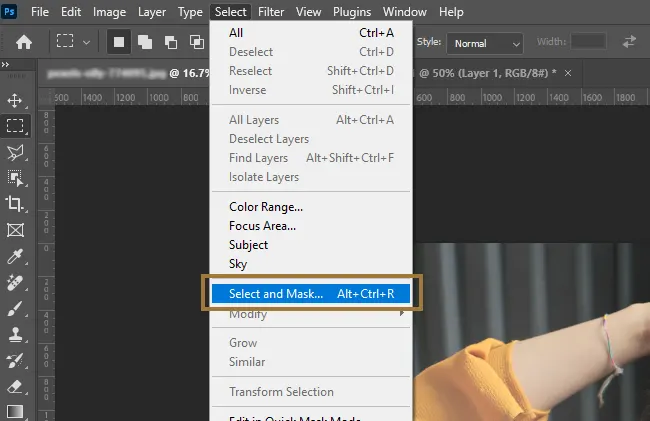
This opens Photoshop’s dedicated masking workspace where you can create and refine selections more accurately.
Step 2: Use Select Subject for Automatic Background Removal
Photoshop’s AI can automatically detect the main subject in your image.
Simply click: Select Subject
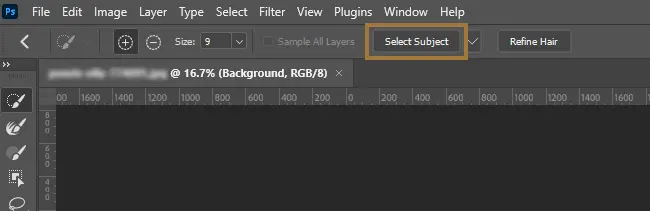
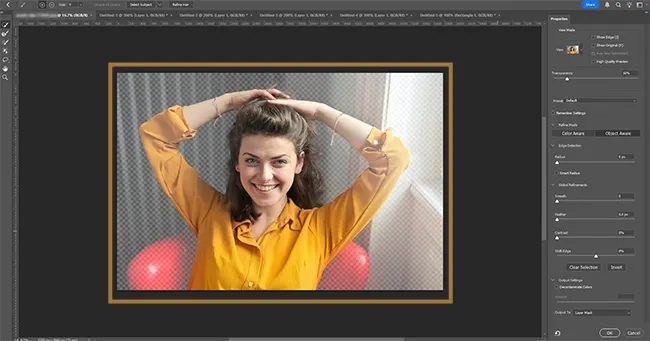
Photoshop will analyze the image and creates an automated selection outline around your subject.
This works especially well for:
- People
- Animals
- Products
- Objects with clear contrast
The AI-generated selection is usually very accurate, but you’ll still need to refine small details manually.
Step 3: Refine Your Selection
Zoom into your image and inspect the edges carefully.
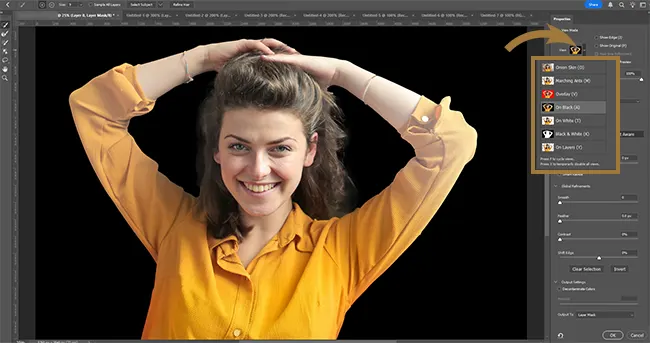
Common areas needing refinement:
- Fingers
- Clothing edges
- Hair
- Accessories
Use the Quick Selection Tool to add missing areas back into the selection.
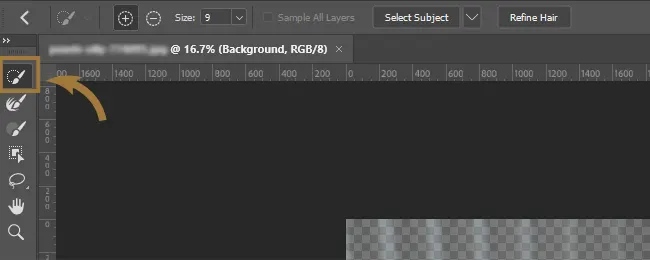
You can also use the Brush Tool to manually paint missing details.
Step 4: Smooth and Sharpen Mask Edges
Use the Global Refinements sliders in the right panel to smooth out the edges:
- Smooth (1–5): Removes jagged edges.
- Contrast (5–15%): Sharpens soft mask edges.
- Feather (0): Adds blur to edges for softer transitions.
- Shift Edge (-5% to -10%): Pulls the mask boundary inward to eliminate halos or fringing.
These settings help create more realistic cutouts.
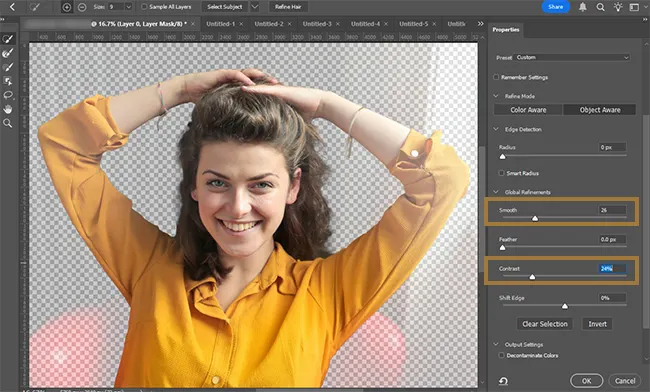
You can also manually paint imperfections away using the Brush Tool.
Step 5: Output as a Layer Mask
Once satisfied:
- Scroll to Output Settings
- Choose Output To → Layer Mask
- Click OK
Using a Layer Mask is important because it’s non-destructive.
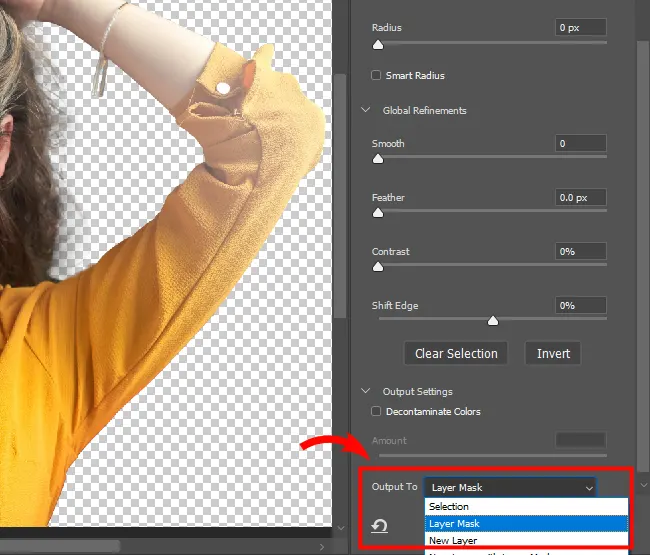
That means:
- No pixels are permanently deleted
- You can always restore hidden areas later
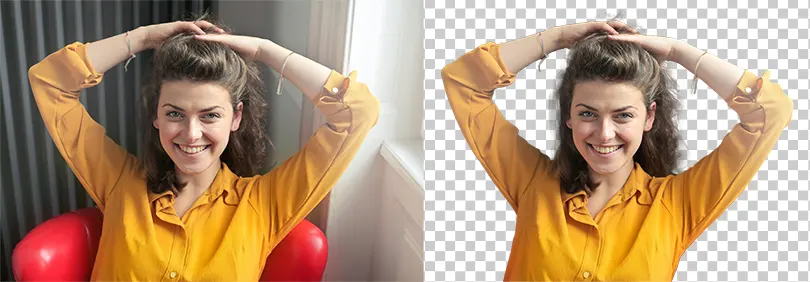
Step 6: Add a New Background
To place your subject into a new scene:
- Go to File → Place Embedded
- Select a new background image
- Resize and position it
- Press Enter to confirm
Your subject is now composited into a completely new environment.
Method 3: Refine Edge Brush (Best for Hair & Fur)
Selecting fine strands of hair, fur, or semi-transparent fabrics is notoriously difficult. The Refine Edge Brush Tool solves this problem cleanly.
- Open your image in the Select and Mask workspace (`Select > Select and Mask`).
- Select the Refine Edge Brush Tool (R) from the left toolbar.
- Adjust the brush size using the bracket keys `[` and `]`.
- Brush gently around the outer edges of the hair or fur.
- Photoshop will automatically distinguish hair strands from the background colors.
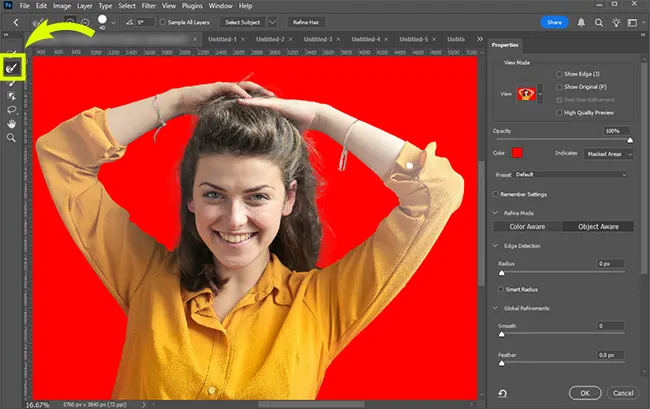
AI Short Cut: You can also click the Refine Hair button in the top options bar for an automated AI hair selection before fine-tuning with the brush manually.
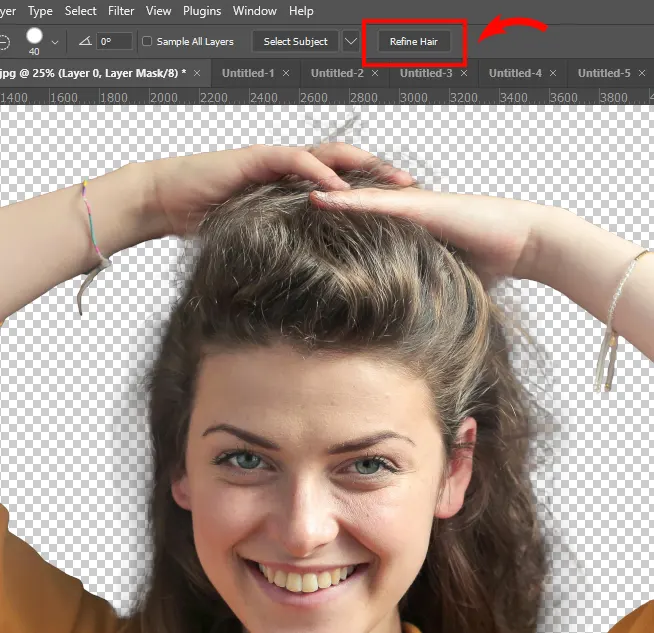
However, manual refinement often produces better professional results.
Method 4: The Pen Tool (Best for Product Photography & Hard Edges)
AI tools can leave soft or wavy edges on man-made objects. For ultra-crisp edges on products, furniture, vehicles, or architectural photos, the Pen Tool is the industry standard.

Steps:
- Select the Pen Tool (P) from the left toolbar.
- In the top options bar, ensure the mode is set to Path.
- Zoom in close (`Ctrl + +` / `Cmd + +`).
- Click along the outline of your subject to create anchor points:
- Straight edges: Click point-to-point.
- Curved edges: Click and drag handles to shape the curve.
- Close the path by clicking back on the very first anchor point.
- Right-click inside the path and choose Make Selection (Feather Radius: `0` or `0.5` pixels).
- In the Layers panel, click the Add Layer Mask icon at the bottom.
Method 5: Color Range & Magic Wand (Best for Solid & White Backgrounds)
If your image was shot in a studio on a solid white, black, or green screen background, using color selection is the fastest approach.

Steps:
- Go to Select > Color Range.
- Set the Select dropdown to Sampled Colors.
- Click the Eyedropper tool on the background color you want to delete.
- Adjust the Fuzziness slider until your subject appears fully black and the background appears solid white in the preview box.
- Click OK to generate the selection.
- Hold `Alt` (Windows) or `Option` (Mac) and click the Add Layer Mask icon to invert and hide the background.
How to Fix Common Masking Issues (Halos & Fringing)
After removing a background, you might notice a thin white or dark outline around your cutout (known as a halo or fringe). Here is how to fix it fast:
- Select your Layer Mask thumbnail in the Layers panel.
- Go to Filter > Other > Minimum.
- Set the Radius to 1 or 2 pixels and click OK.
- Alternatively, select the Layer Mask and use the Brush Tool (B) set to Soft Round, painting with Black to clean up stray background remnants.
- Brush Colors
- White = Reveal pixels
- Black = Hide pixels
Keyboard Shortcuts Cheatsheet
| Action | Windows Shortcut | Mac Shortcut |
| Open Select & Mask | `Ctrl + Alt + R` | `Cmd + Option + R` |
| Add to Selection | Hold `Shift` | Hold `Shift` |
| Subtract from Selection | Hold `Alt` | Hold `Option` |
| Swap Foreground / Background Color | `X` | `X` |
| Quick Mask Mode Toggle | `Q` | `Q` |
| Change Brush Size | `[` or `]` | `[` or `]` |
Frequently Asked Questions (FAQ)
What is the easiest way to remove a background in Photoshop?
The easiest way is using the Remove Background button in the Properties Panel (or Contextual Taskbar). It uses Adobe AI to select the subject and create a layer mask in 1 click.
Why should I use a Layer Mask instead of deleting pixels with the Eraser Tool?
Using a Layer Mask is non-destructive. If you accidentally remove part of your subject, you can paint it back using a white brush on the mask. The Eraser Tool permanently destroys image pixels.
How do I remove a white background in Photoshop?
Go to Select > Color Range, click on the white background with the Eyedropper tool, adjust the Fuzziness slider, click OK, and apply a Layer Mask.
How do I save an image with a transparent background in Photoshop?
Go to File > Export > Export As…, choose PNG as the format, make sure the Transparency checkbox is ticked, and click Export.
Final Thoughts
Mastering how to remove backgrounds in Photoshop comes down to picking the right tool for the job:
- Use Remove Background AI for fast work.
- Use Refine Edge for hair and portraits.
- Use the Pen Tool for crisp product shots.
Combine these methods, refine your edges using Layer Masks, and you’ll get clean, professional cutouts every time.
You Might Like:
Suggested Pro Downloads
-

Automotive Logo PSD Mockup
$2.99 Add to cart -

Femme Aesthetics – Beauty, Spa & Wellness Logo Template (Vector)
Price range: $29.00 through $125.00 Select options This product has multiple variants. The options may be chosen on the product page -
Corporate Wall Design
$9.99 Add to cart -

Logistics Company Logo Design
$3.99 Add to cart
Latest from @CreativeAlys YouTube Channel

70s Bubbly 3D Typography Tutorial | Adobe Illustrator

Flat 2D to 3D Stone Wall in Seconds! ⚡ #shorts #photoshop

How to Use 3D Stone Wall Logo Mockup in Photoshop (in 18 Seconds!) | CreativeAlys

Free 3D Stone Wall Logo Mockup PSD Tutorial | How to Edit & Customize in Photoshop

How to Display Latest YouTube Videos in WordPress (Free, Fast & No API Limits)