Removing backgrounds in Photoshop is one of the most useful skills every designer, photographer, and content creator should learn. Whether you want to create product photos, thumbnails, posters, composites, or transparent PNG images, Photoshop offers powerful tools that make background removal easier than ever.
In this beginner-friendly Photoshop tutorial, you’ll learn how to remove backgrounds using the Select and Mask Workspace, Layer Masks, AI-powered Select Subject, and advanced hair masking techniques.
By the end of this guide, you’ll know how to create clean professional cutouts in Photoshop without damaging your original image.
Why Remove Backgrounds in Photoshop?
Background removal is commonly used for:
- Product photography
- YouTube thumbnails
- Social media graphics
- Poster designs
- Photo manipulation
- E-commerce stores
- Transparent PNG images
- Professional composites
Adobe Photoshop includes advanced AI tools powered by Adobe AI that can automatically detect subjects and create accurate selections in seconds.
Want to follow along?
Download the practice image used in this tutorial and learn Photoshop background removal step by step.
Step 1: Open Your Image in Photoshop
Launch Adobe Photoshop and open the image you want to edit.
Once your image is loaded:
- Go to Select
- Click Select and Mask
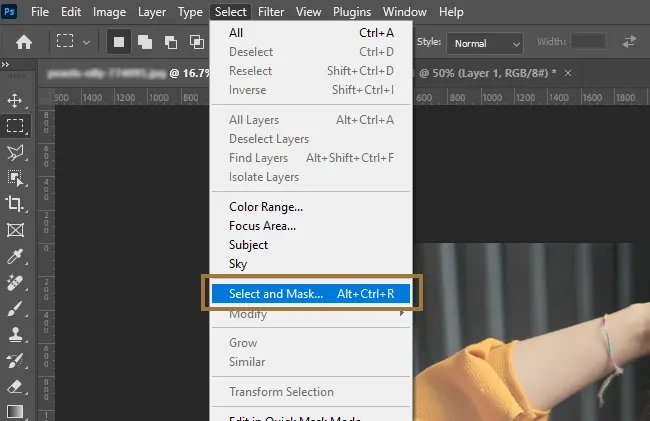
This opens Photoshop’s dedicated masking workspace where you can create and refine selections more accurately.
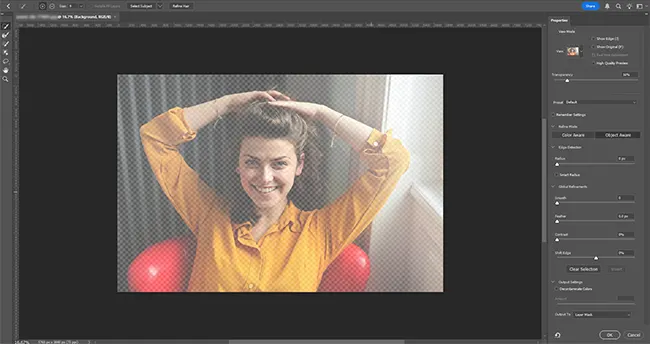
Understanding the Select and Mask Workspace
The Select and Mask workspace contains:
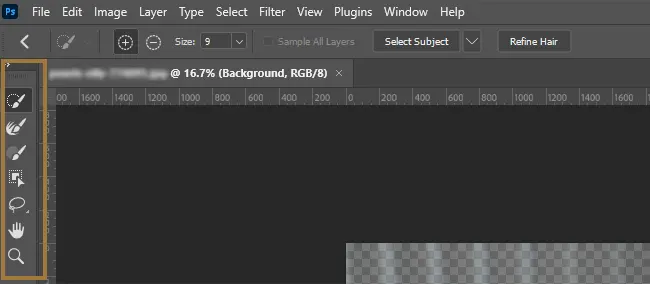
Toolbar (Left Side)
Includes tools like:
- Quick Selection Tool
- Refine Edge Brush Tool
- Brush Tool
- Object Selection Tool
- Lasso Tool
- Hand Tool
- Zoom Tool
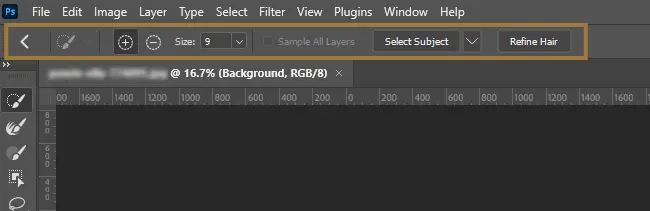
Options Bar (Top)
Displays settings for the currently selected tool.
Properties Panel (Right Side)
Contains:
- View Modes
- Global Refinements
- Output Settings
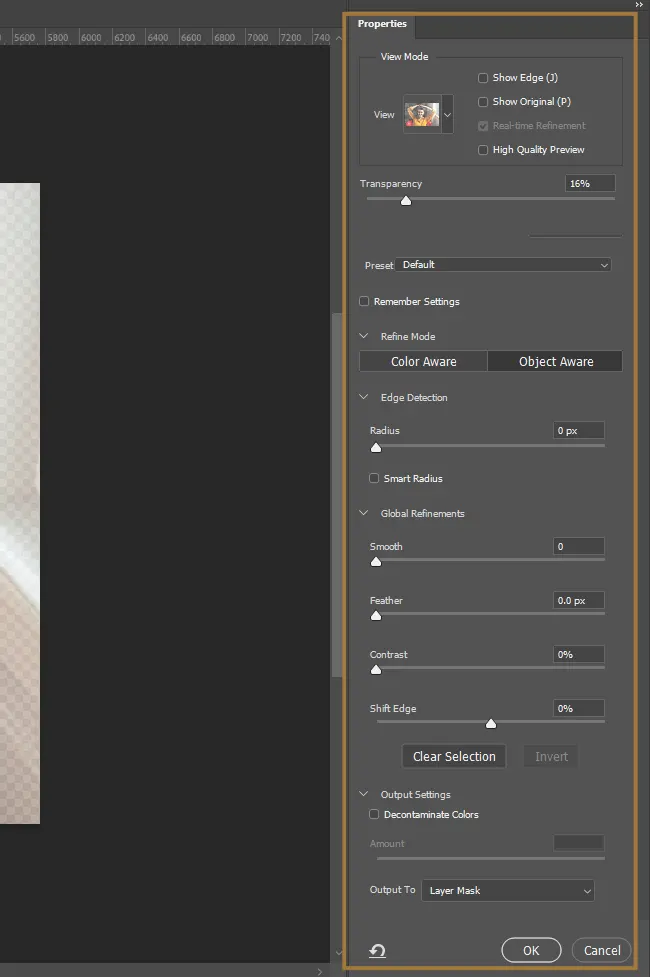
These controls help refine edges and improve the quality of your cutout.
Step 2: Use Select Subject for Automatic Background Removal
Photoshop’s AI can automatically detect the main subject in your image.
Simply click:
Select Subject
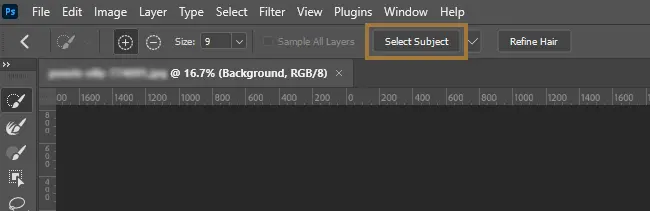
Photoshop will analyze the image and generate a selection automatically.
This works especially well for:
- People
- Animals
- Products
- Objects with clear contrast
The AI-generated selection is usually very accurate, but you’ll still need to refine small details manually.
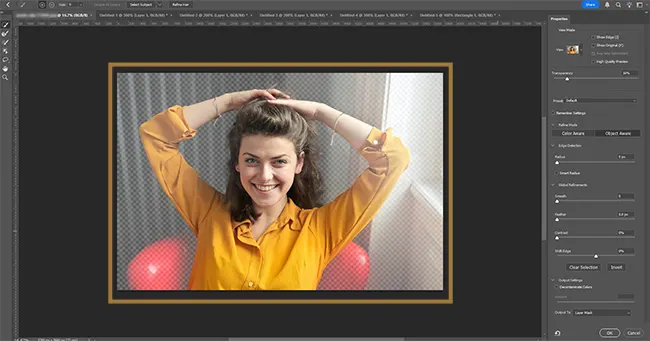
Step 3: Refine Your Selection
Zoom into your image and inspect the edges carefully.
Common areas needing refinement:
- Fingers
- Clothing edges
- Hair
- Accessories
Use the Quick Selection Tool to add missing areas back into the selection.
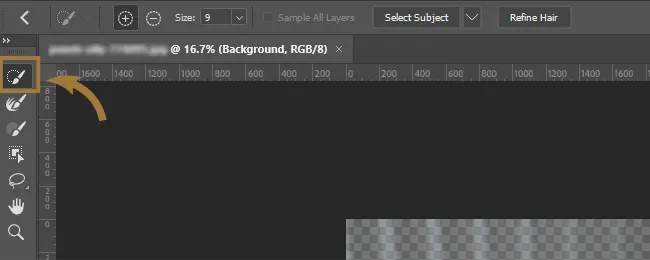
Helpful Shortcut
Hold Alt (Windows) or Option (Mac) to subtract unwanted areas from the selection.
You can also use the Brush Tool to manually paint missing details.
Step 4: Smooth and Sharpen Mask Edges
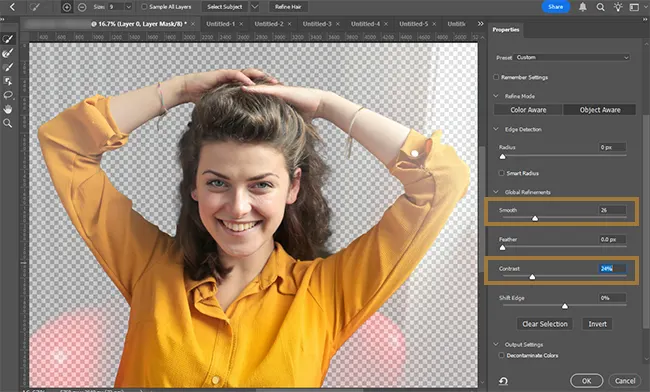
Inside the Global Refinements section, you’ll find powerful edge controls:
Smooth
Removes jagged edges and creates smoother selections.
Contrast
Sharpens soft edges.
Feather
Adds blur to edges for softer transitions.
Shift Edge
Moves edges inward or outward to remove halos or fringing.
For most images:
- Increase Smooth slightly
- Increase Contrast moderately
- Reduce Shift Edge slightly
These settings help create more realistic cutouts.
Step 5: Remove Edge Halos and Fringing
White outlines around your subject are called halos or fringing.
To fix this:
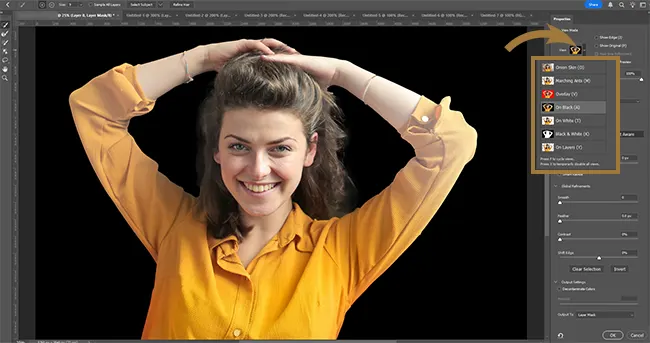
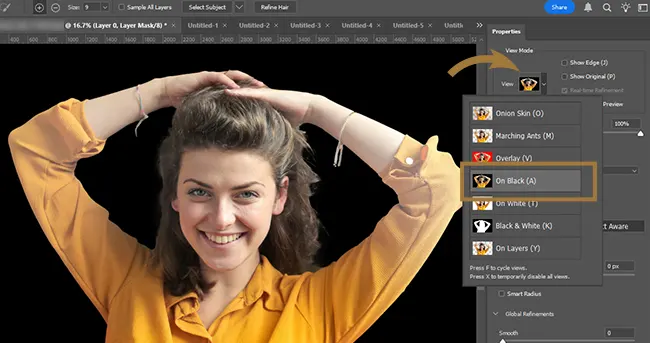
- Change View Mode to On Black
- Use Shift Edge
- Move the slider slightly left
This pulls the mask inward and removes unwanted edge artifacts.
You can also manually paint imperfections away using the Brush Tool.
Step 6: Refine Hair in Photoshop
Hair is usually the hardest part of background removal.
Instead of editing hair with the main body selection, refine it separately for better results.
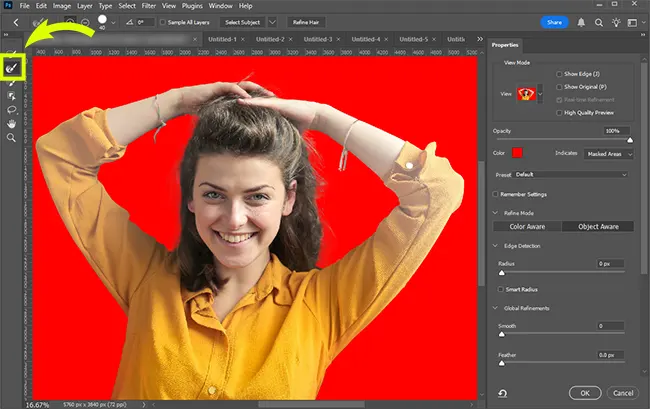
Use the Refine Edge Brush Tool
- Select the Layer Mask
- Click Select and Mask
- Choose the Refine Edge Brush Tool
- Paint around the hair
Photoshop analyzes nearby pixels and improves transparency around fine strands of hair.
Photoshop Refine Hair Feature
Newer versions of Photoshop include the Refine Hair button powered by AI.
It can automatically detect:
- Hair strands
- Flyaway hairs
- Soft edges
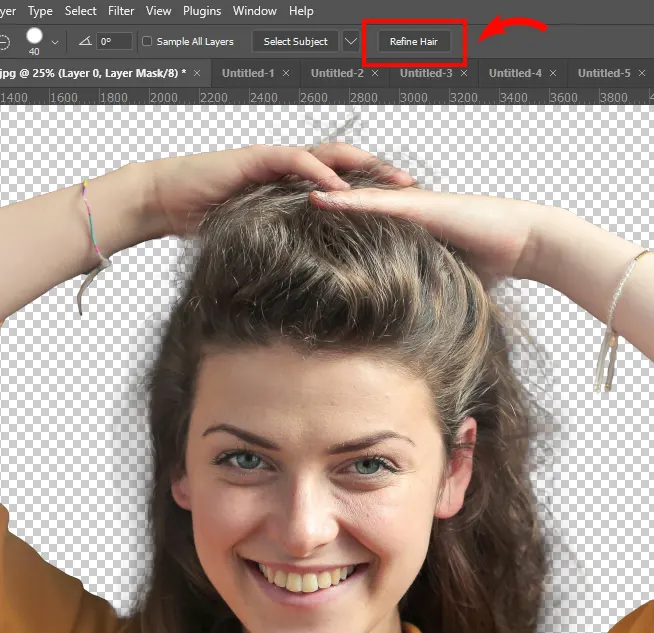
However, manual refinement often produces better professional results.
Step 7: Output as a Layer Mask
Once satisfied:
- Scroll to Output Settings
- Choose Output To → Layer Mask
- Click OK
Using a Layer Mask is important because it’s non-destructive.
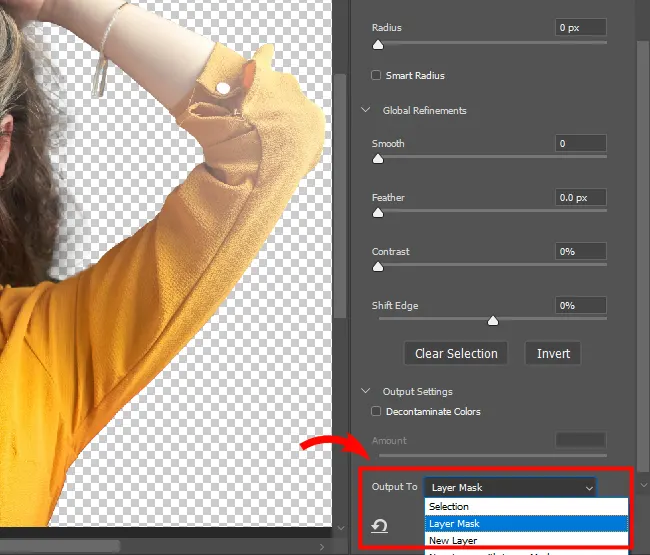
That means:
- No pixels are permanently deleted
- You can always restore hidden areas later
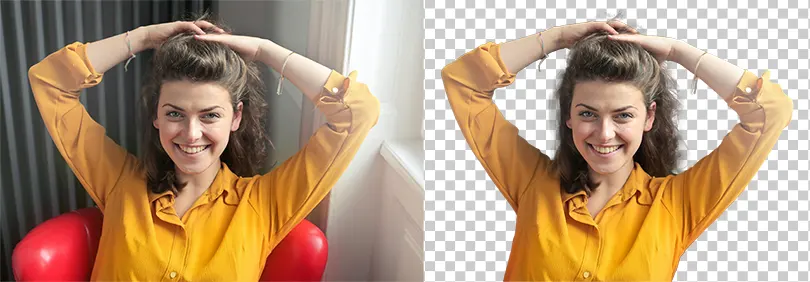
Step 8: Fix Remaining Mask Imperfections
Even after masking, you may notice:
- Missing details
- Rough edges
- Small transparency issues
Use the Brush Tool on the Layer Mask:
Brush Colors
- White = Reveal pixels
- Black = Hide pixels
Useful Shortcut
Press X to swap between black and white quickly.
This speeds up masking adjustments significantly.
Step 9: Add a New Background
To place your subject into a new scene:
- Go to File → Place Embedded
- Select a new background image
- Resize and position it
- Press Enter to confirm
Your subject is now composited into a completely new environment.
Bonus: Photoshop Remove Background Button
Photoshop also includes a quick Remove Background button in the Properties Panel.
This feature:
- Uses Adobe AI
- Automatically creates a mask
- Removes the background instantly
It’s extremely fast for beginners and simple projects.
However, manual refinement still gives the best professional-quality results.
Tips for Better Background Removal in Photoshop
Use High-Resolution Images
Better image quality produces cleaner selections.
Zoom In Frequently
Small imperfections are easier to fix up close.
Separate Hair from Body Refinements
Different edges require different masking techniques.
Use Layer Masks Instead of Erasing
Always work non-destructively.
Practice with Different Backgrounds
Complex backgrounds improve your masking skills quickly.
Final Thoughts
Learning how to remove backgrounds in Photoshop is an essential skill for graphic designers, photographers, and digital artists.
Thanks to AI-powered tools like:
- Select Subject
- Refine Hair
- Select and Mask Workspace
Photoshop makes professional background removal faster and easier than ever before.
The key to great cutouts is patience and edge refinement. Spend extra time polishing details and your results will look dramatically more professional.
Frequently Asked Questions (FAQ)
What is the easiest way to remove background in Photoshop?
The easiest method is using:
Select Subject → Select and Mask → Output to Layer Mask
Is Photoshop AI background removal accurate?
Yes. Adobe AI is extremely accurate for most subjects, especially portraits and products.
How do I remove hair backgrounds in Photoshop?
Use the Refine Edge Brush Tool inside the Select and Mask workspace.
What is the difference between Layer Mask and Eraser Tool?
A Layer Mask is non-destructive, meaning hidden pixels can be restored later. The Eraser Tool permanently deletes pixels.
You Might Like:
Suggested Pro Downloads
-
Sale!

Premium Elegant Fashion Boutique Logo Kit (3 Versions Included)
Price range: $19.00 through $75.00 Select options This product has multiple variants. The options may be chosen on the product page -

Community Logo Design
$5.99 Add to cart -
Man Working on Laptop – Flat Vector Illustration
$5.99 Add to cart -

Businessman Making Phone Call Illustration
$1.49 Add to cart